目录
环境准备
- Windows11 + python3.10
pip install esptool- 从 https://micropython.org/download/ESP8266_GENERIC/ 下载MicroPython最新固件。
连接ESP8266开发版
- USB连接开发板
- 查看设备状态
D:/ $ esptool flash_id
esptool.py v4.8.1
Found 6 serial ports
Serial port COM8
Connecting....
Detecting chip type... Unsupported detection protocol, switching and trying again...
Connecting....
Detecting chip type... ESP8266
Chip is ESP8266EX
Features: WiFi
Crystal is 26MHz
MAC: 48:3f:da:04:3e:53
Uploading stub...
Running stub...
Stub running...
Manufacturer: 20
Device: 4016
Detected flash size: 4MB
Hard resetting via RTS pin...
- 擦除ESP8266的flash内容
D:/ $ esptool --chip esp8266 erase_flash
esptool.py v4.8.1
Found 6 serial ports
Serial port COM8
Connecting....
Chip is ESP8266EX
Features: WiFi
Crystal is 26MHz
MAC: 48:3f:da:04:3e:53
Uploading stub...
Running stub...
Stub running...
Erasing flash (this may take a while)...
Chip erase completed successfully in 14.6s
Hard resetting via RTS pin...
- 刷入固件
注意--flash_size detect参数不要省略,否则可能会导致输入固件无法正常使用。
D:/esp8266 $ esptool.exe write_flash --flash_size detect 0 ESP8266_GENERIC-20241129-v1.24.1.bin
esptool.py v4.8.1
Found 6 serial ports
Serial port COM8
Connecting....
Detecting chip type... Unsupported detection protocol, switching and trying again...
Connecting....
Detecting chip type... ESP8266
Chip is ESP8266EX
Features: WiFi
Crystal is 26MHz
MAC: 48:3f:da:04:3e:53
Uploading stub...
Running stub...
Stub running...
Configuring flash size...
Auto-detected Flash size: 4MB
Flash will be erased from 0x00000000 to 0x0009bfff...
Flash params set to 0x0040
Compressed 635956 bytes to 425615...
Wrote 635956 bytes (425615 compressed) at 0x00000000 in 37.6 seconds (effective 135.2 kbit/s)...
Hash of data verified.

Leaving...
Hard resetting via RTS pin...
- 连接网络
成功刷入固件后,设备会自动重启,并创建一个WiFi热点,名称格式MicroPython-xxxxxx,密码为micropythoN(注意大写的N),热点地址为192.168.4.1。
- 查看ESP8266文件
固件刷入后,准备环境查看并传入自己的py程序。
pip install adafruit-ampy, 安装成功后,查看文件,注意传入正确的端口:
D:/esp8266 $ ampy -p COM8 ls
/boot.py
boot.py为ESP8266每次重启后或者深度睡眠唤醒后执行的代码。
- 编写代码并上传运行
编写main.py上传至flash。每次ESP8266模组重启后,会先运行boot.py然后运行main.py,在main.py中写入持续运行的业务代码即可。
以下示例,开发板上LED小灯重复亮一秒暗一秒,每3秒串口打印一次内存情况:
import gc
import uasyncio
from machine import Pin

async def update_led():
    while True:
        print("led_update")
        led = Pin(2, Pin.OUT)
        led.on()
        await uasyncio.sleep(1)
        led.off()
        await uasyncio.sleep(1)

async def update_system_info():
    while True:
        info = f"[system_info] mem_alloc:{gc.mem_alloc()} mem_free:{gc.mem_free()} threshold:{gc.threshold()}"
        print(info)
        await uasyncio.sleep(3)

loop = uasyncio.get_event_loop()
loop.create_task(update_led())
loop.create_task(update_system_info())
loop.run_forever()
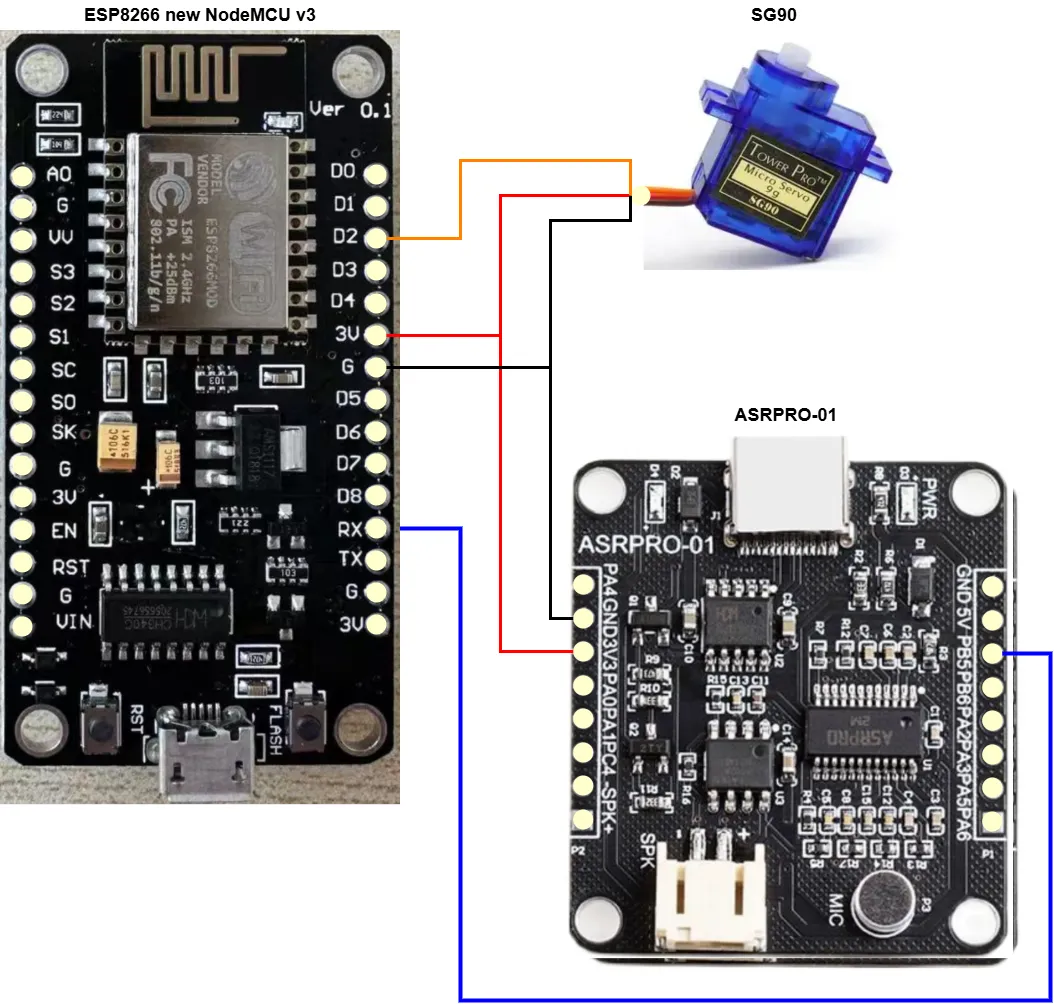
ESP8266作为控制中枢语音控制舵机

原理:
- ESP8266给ASRPRO-01和舵机SG90提供电源;
- ASRPRO-01通过设置
PB5为串口输出将语音识别ID传给ESP8266RX接收; - ESP8266通过
D2PWM输出控制舵机转动。
一些经验
-
如果终端和ESP8266失去连接(电脑显示串口在,但命令行无法和ESP8266开发板交互),但ESP8266上的程序正常执行,请考虑:
- 断开ESP8266除电脑之外的所有其他设备连接,再试一次;
- 尝试使用putty之类的工具连接上去,看是否能使用
Ctrl-C终止程序执行; - 使用电脑终端执行
esptool flash_id测试是否能探测到设备信息。
-
main.py文件大小不要超过10KB,否则非常容易撑爆内存。